
Kanban Tutorial
In this tutorial, we'll give you step-by-step instructions on how to drive a kanban project, prioritize your work, visualize your workflow, and minimize work-in-progress to prevent your team from being overloaded, all within Jira.
所要時間
読む時間 10 分。2、3 週間で完了
対象者
カンバン ソフトウェア開発や Jira を初めて使用する方
前提条件
Jira アカウントを作成していること
カンバンとは
カンバンは、チームがソフトウェアを短時間で頻繁にリリースするのを支援する点でスクラムと似ています。ただし、カンバンは計画と実行がより柔軟である点が異なります。時間ベースのスプリントで作業する代わりに、カンバンでは作業が継続的に行われます。チームはバックログから個別の作業成果を取り出して完了に導きます。
Step 1: Create a kanban project
Once you login to Jira, you will have the option to create a project. When you get the project type selection, ensure you select Kanban software development project.
Your new Kanban software development project will also include a Kanban board. Once you've created your project, your team's Kanban board is the first thing you'll see. This is where your team will eventually keep track of their work.
Step 2: Configure your workflow
In Jira, the Kanban project gives you an out-of-the-box workflow with Backlog, Selected for Development, In Progress, and Done. This lets the product owner add tasks to the backlog, and move them to "ready for development" once the task or user story is fully baked. Team members can then select from that column and move to in-progress and to done. If your development workflow is different, it's easy to add or remove a workflow state. Many teams want to add a QA or reviewing stage in their workflow, for example.
To configure your columns and workflow, click Board in the top-right corner of the backlog, then select Configure.
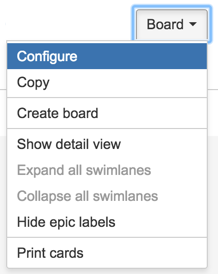
Once you're in the board configuration page, select Columns from the sidebar. You can either add a status or column with the buttons on the right, or hit the trash icon to remove a column. Once you have the workflow columns you want, hit Back to board in the top-right corner.
Step 3: Add tasks, bugs, or user stories to the backlog
Use the Create button to start adding tasks, bugs or user stories to your backlog. In Kanban, this is the first column of your board. If you don't have a project or feature in mind, try creating some sample tasks to get started and see how it works.
ユーザーストーリーとは?
アジャイル フレームワークでは、ユーザー ストーリーが最小作業単位です。たとえば、「{type of user}である私は、{goal}を実行して{receive benefit}を実現したい」は、ユーザー ストーリーの例です。
単純な例として、Web サイトを使用してユーザーストーリーを作成してみましょう。
来年の予算編成の参考として昨年の購入内容を確認できるように、顧客としてアカウントを作成したい。
ユーザーストーリーは、プロダクト所有者が大まかに描いた後、プロダクトチーム全体が共同で詳細な要件を決定します。
Step 4: Prioritize the backlog
To rank or prioritize the items in the backlog, drag and drop cards up or down on the first column based on their priority.
カンバンでの優先順位付け:
カンバンチームは現在進行中の作業にのみ集中します。チームが作業項目を完了すると、 次の作業項目を取り出します。現在の作業項目以外の変更はチームに何の影響を与えないため、プロダクトオーナーはチームの作業を中断することなく、自由にバックログの優先順位を変えられます。プロダクト所有者が常にバックログの一番上に最も重要な作業項目を配置している限り、開発チームは事業に最大の価値を還元できるのです。そのため、スクラムで見るような固定長の反復は不要です。
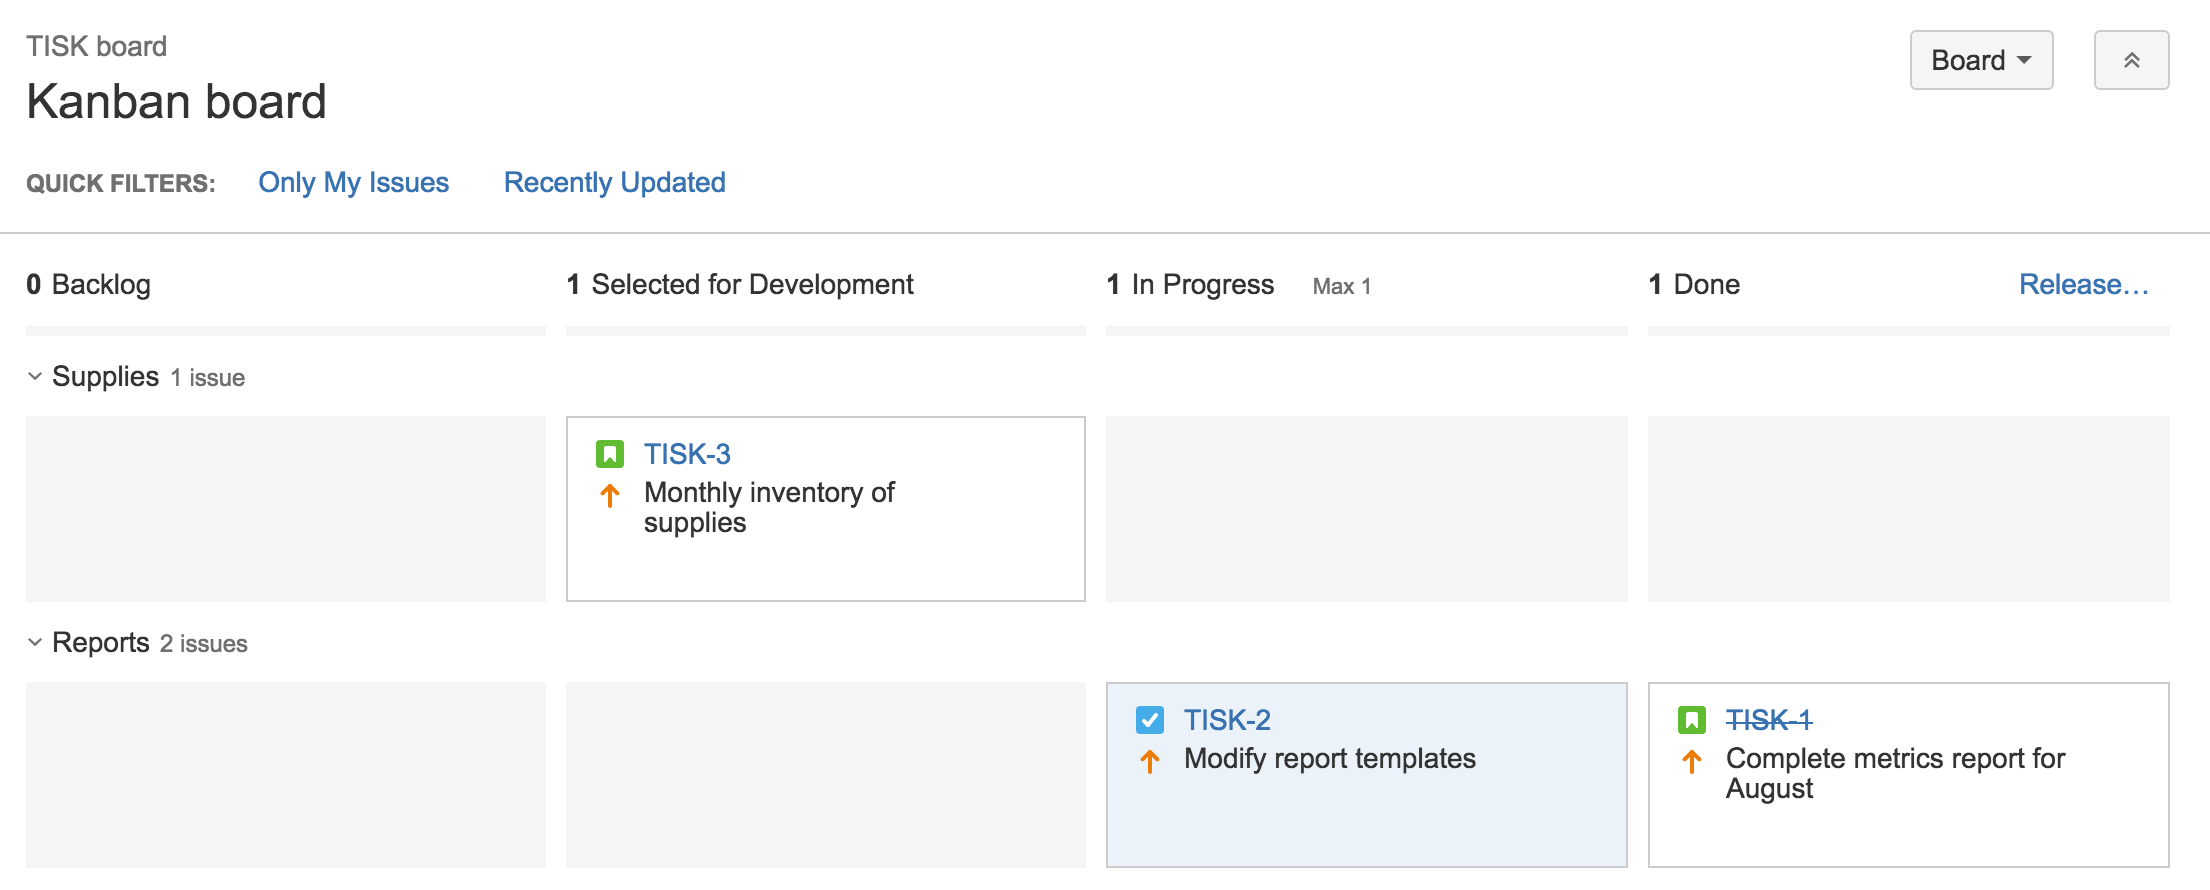
It may be helpful to use the priority key when adding issues to the board so that it's easy to visualize when prioritizing. The default settings in Kanban will add swimlanes to your board, one for high priority items, which is labeled "Expedite," and one for everything else. You can also use tools like labels or features within each issue to help you categorize pieces of work.
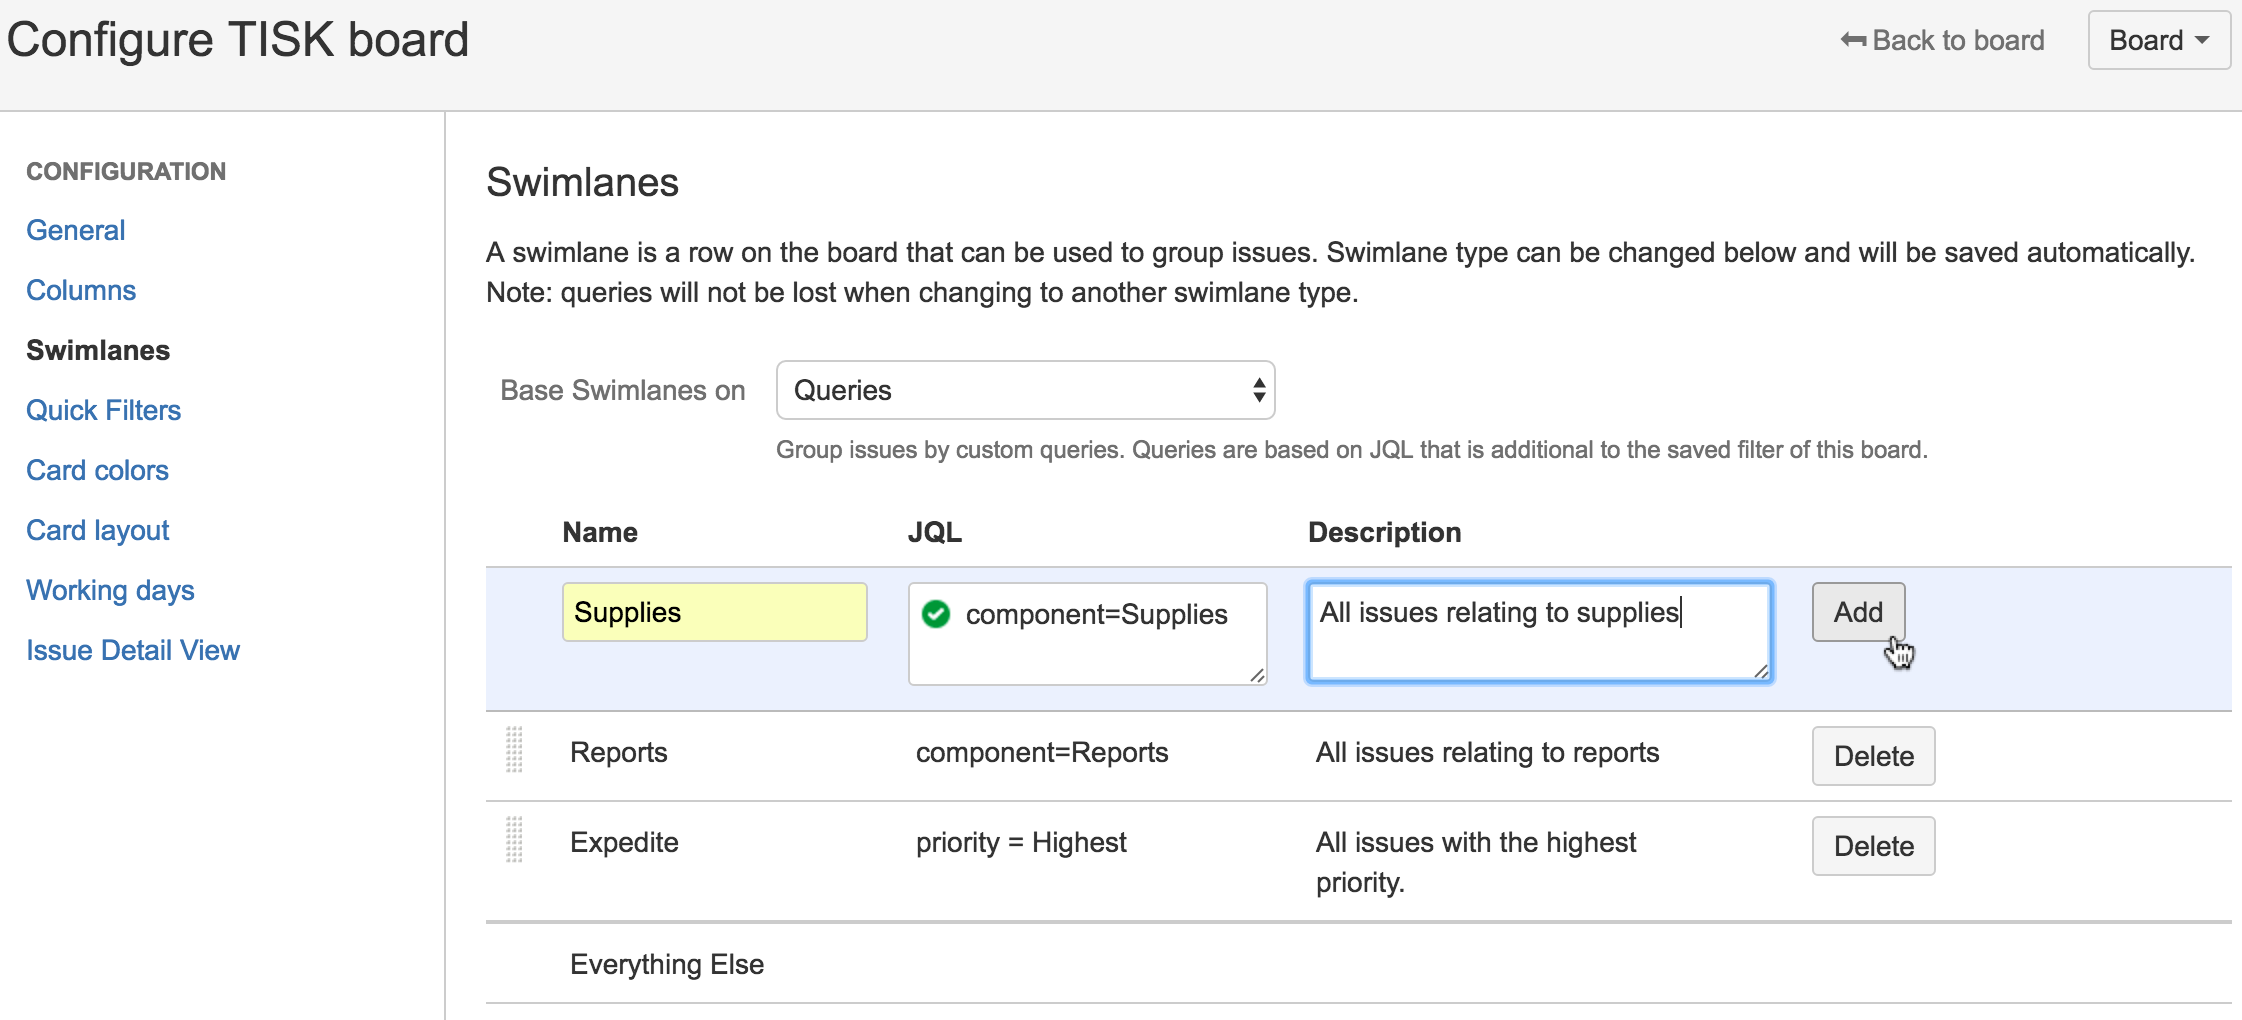
スイムレーンとは?
スイムレーンは課題をカテゴリー化し、アジャイルチームは次に取り組むべき課題を確認できます。デフォルトのスイムレーンを編集するには、バックログの右上隅にあるボード設定に移動し、サイドバーから [Swimlanes (スイムレーン)] を選択します。JQL で課題をカテゴリー化して、この画面でスイムレーンを追加できます。
Step 5: Select work from the backlog
In Kanban, team members take items from the Backlog or Selected for Development column and move them to In Progress.
We recommended limiting the work that is in-progress. To make this easier, you might consider adding limits to your columns. Doing this will cause a warning to show if your team moves too many tasks to a column.
進行中の作業を制限する理由とは?
進行中の作業 (WIP) に制限を設定できます。つまり、ボードの各列に存在する最小および最大の作業量を設定できます。WIP 制限を設定することで、チームにより小さい単位のタスクを重点的に処理させ、もう少しで完了という作業の数を減らすことが可能になり、チームの作業が全体的に改善されます。また、WIP 制限により、深刻な事態となる前にチームのデリバリー パイプラインのボトルネックを明確化します。これらの利点により、顧客に与える価値をより迅速に増やすことができるため、WIP 制限はアジャイル開発の貴重なツールとなります。詳細はこちらをご覧ください。
In Jira, you can add minimum or maximum limits for each column in the Columns section of the Board configuration.
Step 6: hold team meetings
In Kanban, daily stand-ups and retrospectives are optional. However, we recommend that you and your team decide on the cadence of meetings. A daily stand-up can still be beneficial for the team to highlight where there are blockers in their work. It may also be helpful for the product owner to share what he or she has prioritized and why. Figure out what works for your team and try it out — you can always adjust as you go.
毎日のスタンドアップミーティングとは?
必須出席者: 開発チームとプロダクト所有者
任意出席者: チーム関係者
タイミング: 1 日 1 回、一般的に朝。
所要時間: 15 分以下。会議室を予約してスタンドアップを座って実施しないでください。立ったまま実施することでミーティング時間の短縮に役立ちます。
アジャイル フレームワーク: スクラムとカンバン。
目的: デイリー スタンドアップは、チーム全体で何が起こっているかをすばやく全員で共有するために行われます。詳細なステータスミーティングではありません。トーンは軽く楽しくしつつ、有益なものにする必要があります。各チームメンバーに次の質問に回答してもらってください。
昨日何を完了したか?
今日何に取り組むか?
何かにブロックされていることはあるか?
同僚の前で昨日完了したことを報告する暗黙の説明責任があります。常に同じことを行い、進歩しないチームメンバーには誰もなりたくなりません。
プロからのヒント: 全員が予定どおりに作業できるように、タイマーを使用しているチームもあります。ボールをパスして、全員が注意を払っていることを確認するチームもあります。分散型のチームの多くは、距離を埋めるため、ビデオ会議やグループ チャットを使用しています。あなたのチームはほかと違うのですから、スタンドアップも違ってあたりまえです!
Step 7: Using the Control Chart
At regular intervals, you might take a look at the Control Chart to monitor your team's progress.
管理図とは?
管理図は次の情報を示します。
各課題が次のステータスに移行するまで、特定のステータスを維持する期間。
チームのサイクルタイム。これはチームが各課題を完了するのにかかる平均時間です。製品、バージョンのサイクルタイムを確認できます。
チームのサイクルタイムのローリング平均。チームの効率が向上すると、この数字が下がるのが分かります。
The Control Chart is useful because it helps you analyze how your team works. Some questions you might ask are:
Are certain types of issues taking too long to complete? This may mean that the issues are too complex, or they keep getting bumped for higher-priority work.
Are issues taking too long to transition from a particular status? This may indicate a bottleneck in your team's process.
What's your team's rolling average? Is your team getting more efficient? Why or why not?
Step 8: Using Kanban backlog (optional)
Many teams love the flexibility of Kanban, but they may start to feel that the first column of their board — the backlog — becomes long and unmanageable. That's why we've added a backlog in Kanban software development projects.
The Kanban backlog gives you a backlog for your board, which is on a different tab in your project. The Kanban backlog essentially gives product managers a bigger and dedicated space to freely build and prioritize the backlog, without distracting the team from their current work. The product manager can then move work from the backlog into "ready for dev" to let the team know the work that's upcoming.
Check out Using your Kanban backlog and Enabling the Kanban backlog for more details.

カンバンバックログをオンにする方法
「Jira 管理者」グローバル権限を持つユーザーとしてログインします。
上部のバー > [アプリケーション] から [Jira 管理] を選択し、[Jira] のセクションまでページをスクロール ダウンします。
[Jira ラボ] から、関心のある機能を選択します。
バーンアップチャート
カンバンバックログ
Advanced practices
By now, you may have already realized just how extremely customizable Jira can be. Read on for some advanced tips and tricks that your team can use, to unleash their potential, and finish off work-in-progress faster and more efficiently.
Step 9: Automate away the repetitive tasks
Once you have mastered the art of Kanban, you can start to automate away some of the more repetitive tasks. This is a great way to keep your board clean, your backlog up to date and generally keep your work up to date.
See some of the most commonly used automation rules for Kanban in the Jira Automation Template Library.
Step 10: Using column constraints
In step 5, we've already discussed the importance of limiting work in progress. In this section, we'll focus on that more, especially since limits actually highlight any bottlenecks that your team may be experiencing. By highlighting these early on, your team can reshuffle priorities and figure out a realistic plan of action.
You can configure the column constraints of your board by going to the Columns section of Board configuration. From there, set minimum and maximum constraints for each column.
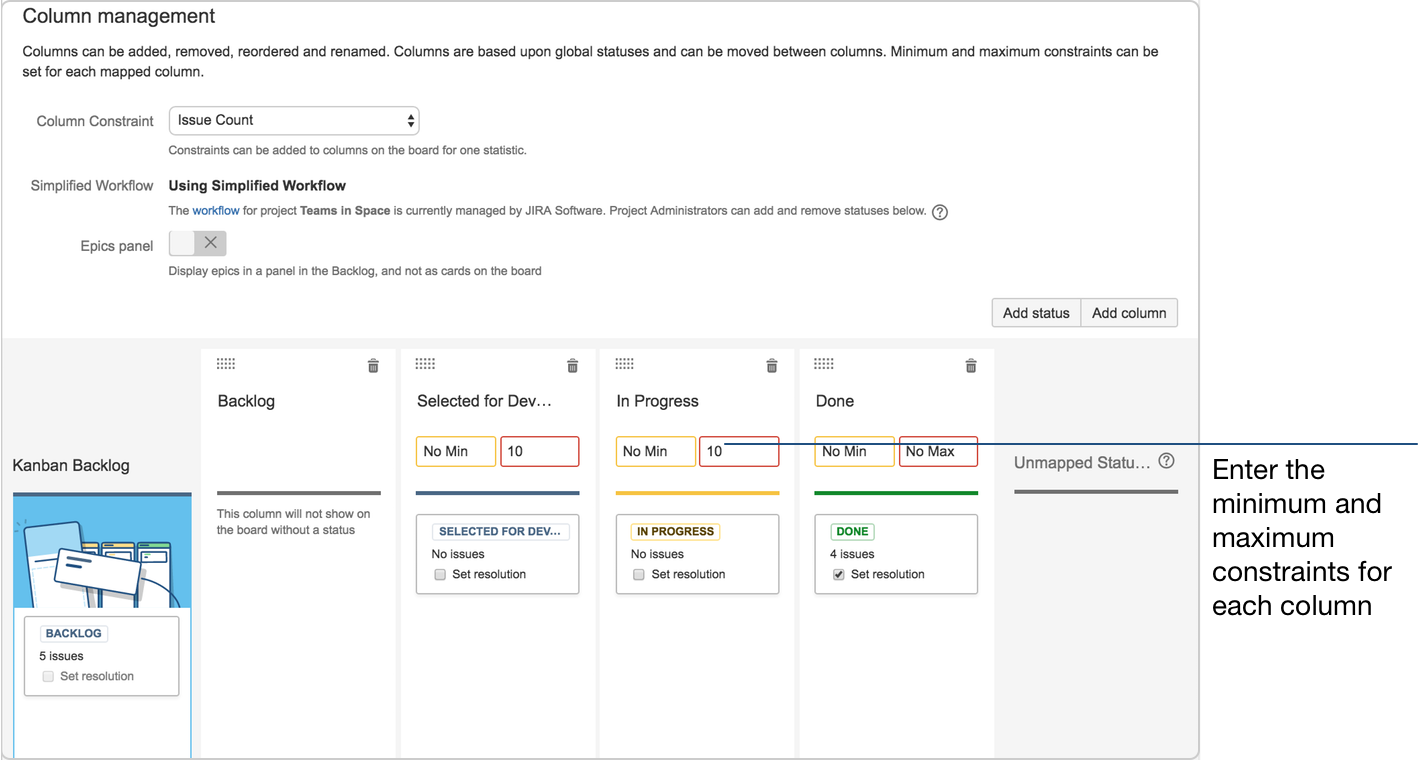
If you have more than 10 issues in either the Selected for Development or In Progress columns, the columns would be colored red at the top:
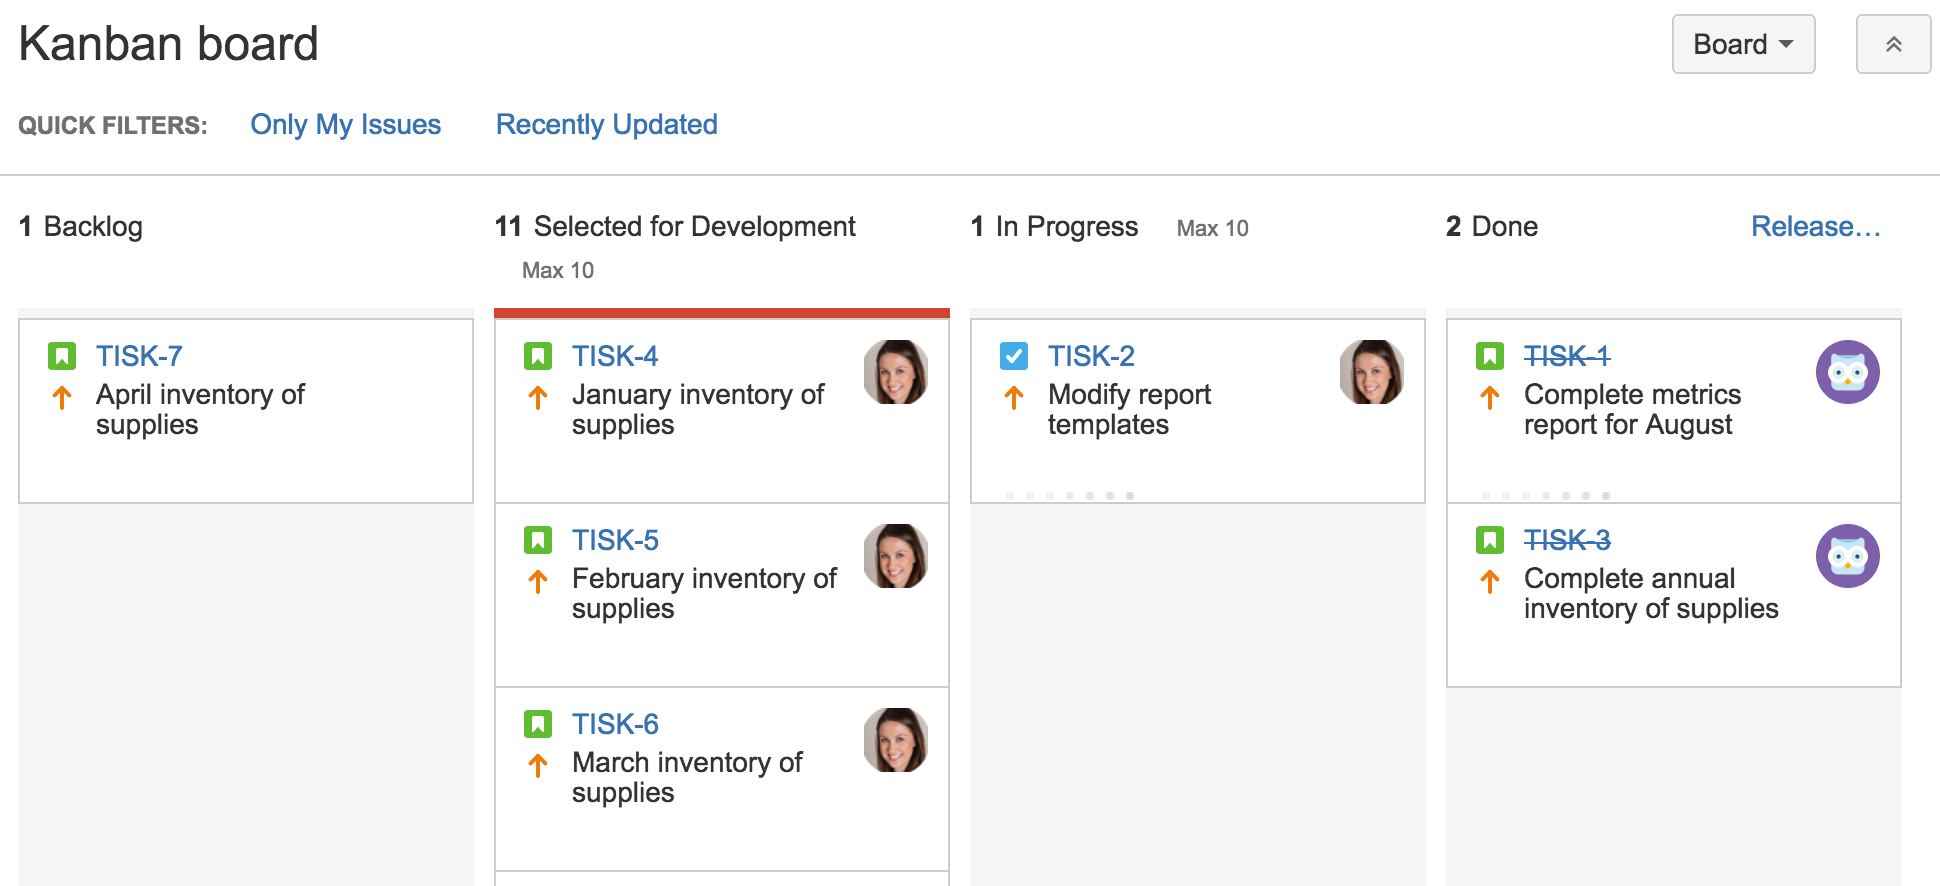
Note that your board may appear differently if you've enabled the Kanban backlog for your board.
Depending on your team's needs, you can go a step further and configure your column constraints to exclude sub-tasks from the count.
For more details on how to do this, go to Configuring columns.
Step 11: Using the Cumulative Flow Diagram
The Cumulative Flow Diagram is one of the important reports you can ever use when working in Kanban methodologies. The Cumulative Flow Diagram lets your team quickly visualize their effort, and match it against the overall progress of the project.
In Jira, the Cumulative Flow Diagram shows the statuses of your team's issues over a period of time:
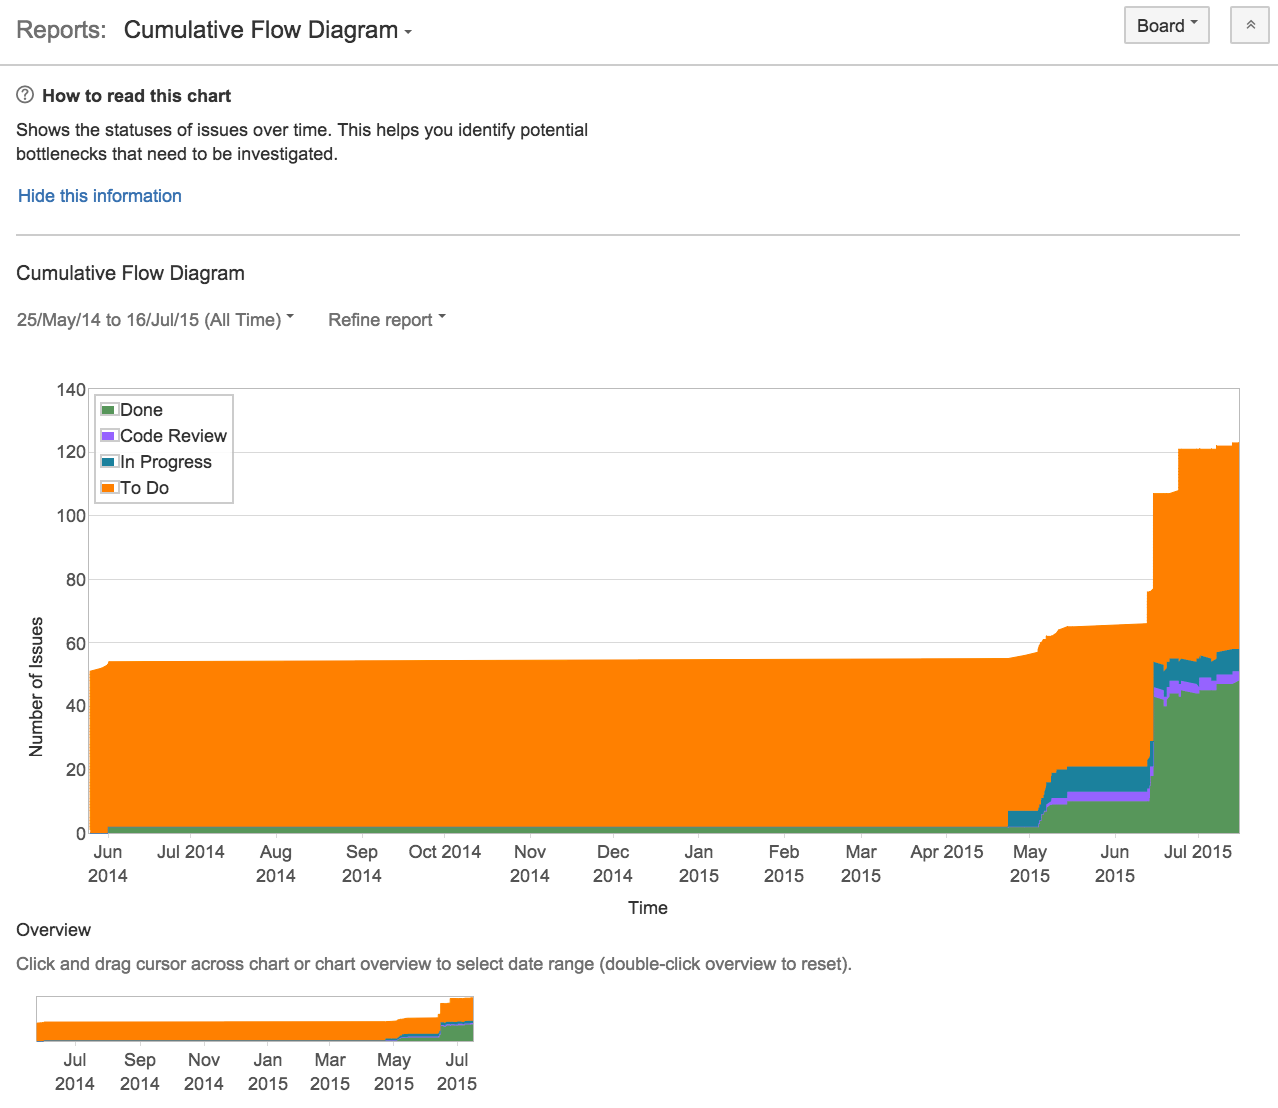
Any bottlenecks will appear as a sudden change of the issue statuses in the diagram — whether the change is a sudden rise or fall, it is definitely worth looking into the issues involved.
When predicting potential bottlenecks, the Cumulative Flow Diagram is indeed a tool your team should consider using.